
Build Your Own IT Lab: The Same Way We Built Ours
A practical guide to building a Proxmox home lab for testing, learning, and validating infrastructure before it reaches production. Based on the lab we use every day.
Every technology recommendation we make at Bullium starts in a lab. Not a vendor-hosted demo. Not a trial account. A physical lab environment where we deploy, configure, stress-test, and break things before they ever touch a client network. Our 7-step evaluation methodology depends on having a lab that mirrors production patterns.
This guide walks through building that kind of lab. Whether you are an IT professional looking to sharpen your skills, an MSP testing new tools before client deployment, or a business owner who wants to understand what your infrastructure team should be doing, a lab is the foundation. Proxmox VE makes it accessible without enterprise licensing costs. The same principles apply whether you are building a personal skills lab at home or setting up a shared team environment for training, POC testing, or pre-production validation. A lab is also the right place to try a new release before it reaches production: see what is new in Proxmox VE 9.2, from the Dynamic Load Balancer to kernel 7.0.
Why Every IT Professional Needs a Lab
Production environments are not the place to learn. When you test a new firewall rule in production, the risk is an outage. When you test it in a lab, the risk is a lesson. The lab is where mistakes are cheap and learning is fast.
Beyond learning, a lab provides a safe environment for validating automation before deployment. An Ansible playbook that works in the lab will work in production, because the lab mirrors production. An Ansible playbook tested only in your head is a liability.
For MSPs and consultancies, a lab is a business requirement. Every tool you recommend, every configuration you apply, every migration you plan should have been validated in a controlled environment first. Clients deserve evidence-based recommendations, not educated guesses.
Hardware Recommendations
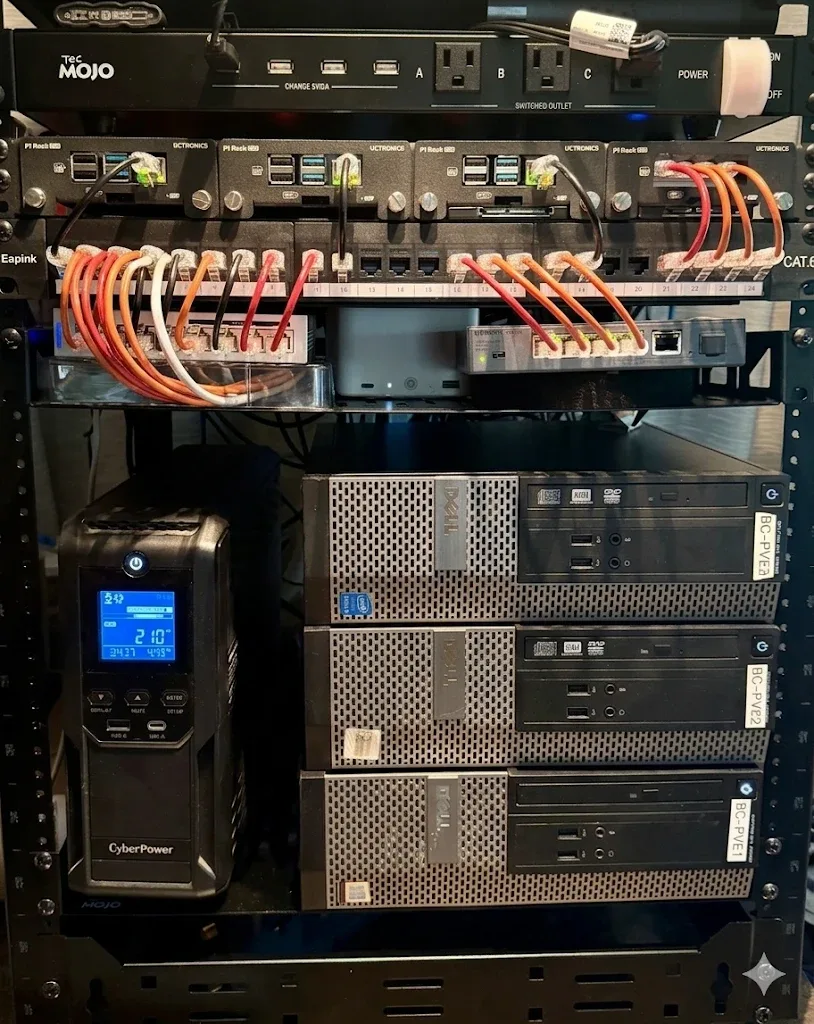
Lab hardware needs to be reliable, relatively quiet, and powerful enough to run the workloads you plan to test. Here are three tiers, organized by capability and use case, all hardware we have tested and validated.
Compact Tier: Mini PCs
Intel NUC, Beelink, or Minisforum mini PCs with 32-64 GB RAM and NVMe storage. Quiet, low power consumption, and surprisingly capable for 5-10 lightweight VMs. A 3-node cluster for HA testing fits on a single shelf.
Best for: Learning, basic automation testing, single-service deployments.
Mid-Range: Used Enterprise Servers
Dell PowerEdge R730, HP ProLiant DL380 Gen9, or similar from secondary markets. 128-256 GB RAM, dual Xeon CPUs, and enterprise SAS/NVMe storage. Expect noise and power draw. Plan for a dedicated space.
Best for: Multi-VM testing, Ceph storage clusters, realistic production replicas.
Enterprise: Multi-Node Cluster
3+ rackmount servers with 10GbE networking, dedicated Ceph OSD drives, and a managed switch with VLAN support. This mirrors a production Proxmox deployment and supports full HA, live migration, and distributed storage testing.
Best for: MSP tool validation, client environment replication, full infrastructure-as-code workflows.
Proxmox Installation and Configuration
Proxmox VE installs directly onto bare metal from a USB drive. The installer handles disk partitioning, network configuration, and initial cluster setup. For a lab, the key decisions during installation are storage backend and network architecture.
Storage: ZFS is the recommended default for lab environments. It provides checksumming (data integrity), transparent compression (more VMs per disk), snapshots (instant rollback), and send/receive (efficient backup replication), all without additional software. For multi-node clusters, Ceph adds distributed storage with automatic replication across nodes.
Networking: Configure a Linux bridge for VM traffic from the start. If your switch supports VLANs (it should), configure VLAN-aware bridges in Proxmox to isolate lab network segments. This mirrors how production environments segment management, storage, and application traffic.
Clustering: Even with a single node, create a cluster during initial setup. This enables the cluster-aware web UI and makes adding nodes later seamless. For HA, you need a minimum of three nodes (two compute + one quorum). See our Proxmox vs VMware comparison for a deeper dive on clustering capabilities.
Practical ZFS: Replacing a Failed Drive
Once your lab is running ZFS mirroring, you will eventually face the real-world scenario of a degraded pool. A drive fails. The pool reports DEGRADED. Now what?
The naive answer is zpool replace. The complete answer involves four more things nobody tells you: verifying the replacement drive's partition layout matches the healthy drive, monitoring the resilver to completion, syncing the EFI partition to the new drive, and updating boot entries so the system remains bootable from either drive. Skip any one of these and you will discover the gap during your next maintenance window, or worse.
We wrote a script that handles all of it. zfs_replace_drive.sh is the script we use with clients running Proxmox with ZFS mirroring on systemd-boot systems. It automates the full replacement workflow: input validation, drive identification, partition layout comparison, zpool replace, resilver monitoring, EFI sync, and boot entry management.
# Download the script
curl -O https://raw.githubusercontent.com/bullium/bc-pub-scripts/main/pve/zfs_replace_drive.sh
chmod +x zfs_replace_drive.sh

# Replace a failed drive (pool name + new drive by-id)
sudo ./zfs_replace_drive.sh rpool ata-Samsung_SSD_870_EVO_500GB_S6PXNL0Y102924K
What the script does
- 1.Validates inputs: confirms the pool exists, is DEGRADED, and the new drive is present
- 2.Identifies devices: finds the UNAVAIL failed device and the healthy ONLINE mirror member automatically
- 3.Verifies layout: compares partition tables of the healthy and replacement drives; aborts on mismatch
- 4.Runs
zpool replaceand monitors resilver progress in real-time - 5.Syncs EFI partition: rsyncs the healthy drive's EFI partition to the new drive
- 6.Updates boot entries: adds EFI entry for new drive, removes stale entry for failed drive
- 7.Logs the operation: appends a summary to
~/zfs_drive_replacement.log
The script requires the replacement drive to already be installed and partitioned to match the healthy drive before running. It supports Proxmox/Debian systems with systemd-boot. Source available at github.com/bullium/bc-pub-scripts.
Essential Lab Services
Once Proxmox is running, these are the foundational services to deploy first. Each one is a building block that makes the rest of the lab more useful.
DNS (Pi-hole or BIND)
Local DNS resolution eliminates reliance on external resolvers and enables hostname-based access to lab VMs. Pi-hole adds DNS-level ad/tracker blocking as a bonus.
VM Templates
Create cloud-init enabled templates for each distribution (RHEL, Debian, Ubuntu). Cloning a template takes seconds versus 15+ minutes for a fresh install. Template creation should be automated with Ansible.
Tailscale Mesh
Install Tailscale on every lab node for zero-trust remote access. No port forwarding, no dynamic DNS, no VPN concentrators. Access your lab from anywhere with end-to-end encryption.
Proxmox Backup Server
Incremental, deduplicated backups of all lab VMs. Essential for confident experimentation. If a test goes wrong, restore to the last known good state in minutes.
Proxmox Datacenter Manager
If your lab spans multiple nodes or clusters, Proxmox Datacenter Manager (PDM) provides a single dashboard for monitoring VE clusters and PBS instances. Useful for multi-site lab setups or when preparing for a production multi-cluster deployment.
Automating Your Lab with Ansible
The real power of a lab comes when you can tear it down and rebuild it effortlessly. Ansible playbooks make lab rebuilds trivial: VM template creation, base configuration, service deployment, and user setup all codified as version-controlled YAML.
This is not just about convenience. It is about building the muscle memory for infrastructure-as-code workflows that translate directly to production. The playbook that provisions a DNS server in your lab should be the same playbook, with different variables, that provisions a DNS server for a client.
Start by automating the tasks you do most frequently: VM creation from templates, SSH key deployment, and firewall rule application. Then expand to service-specific roles (web server, database, monitoring) that you can compose into complete environment playbooks. Every automation you build in the lab is one you can reuse in production.
When the Lab Is for a Team
The same infrastructure that serves an individual's skills development scales directly to shared team use. A business training environment, an MSP validation lab, and a pre-production cluster all start from the same foundation: Proxmox nodes, ZFS storage, Ansible automation, and a monitoring stack. The difference is purpose and scale, not architecture.
For business teams, a shared lab replaces the production environment as the place where new applications get evaluated, new hires get onboarded, and change procedures get tested before the maintenance window. For MSPs, it is the client simulation environment that lets you validate a migration, a tool deployment, or a firewall change before touching a client's network. For mid-market organizations, it is the pre-production cluster that mirrors production so closely that a validated change there can be deployed to the real environment with confidence.
The operational patterns in this article (VM templates, Ansible provisioning, PBS backup discipline, monitoring stack) apply in all of these contexts. The hardware tier you choose from the section above, and the number of nodes you deploy, are the main variables. Everything else is configuration.
From Lab to Production
The ultimate measure of a lab's value is how directly its patterns translate to production. When your lab configuration is expressed as Ansible playbooks with environment-specific variables, the gap between lab and production narrows to a set of configuration values: different IP ranges, different hostnames, different credentials. Same architecture, same automation, same tested configuration. For organizations ready to move beyond the lab, Bullium provides hands-on Proxmox deployment and production infrastructure consulting built on the same workflows described here.
This is infrastructure as code in practice. It is not a theoretical concept. It is the workflow that lets us manage client environments with confidence and deliver documentation that stays current because the documentation IS the automation. The lab is where that workflow is born, tested, and refined.
Need a managed dev/test lab for your team?
We design, build, and automate dev/test, staging, and pre-production lab environments for IT teams, MSPs, and mid-market organizations. Assessment, Design, or full Build engagements available.
Related Reading
Need Help Designing Your Lab or Production Environment?
Whether you are building a lab from scratch, planning a Proxmox deployment, or migrating from VMware, we can provide guidance based on our own operational experience with both platforms.